How to configure your weight based shipping rules in Shopify
Setting up shipping rules in Shopify can confuse some people and I see a lot of questions about this on forums. This post is designed to try and help explain not only how to create shipping rules in Shopify, but also some of the little gotcha's that trip people up.Want to learn how to setup weight based shipping rules in Shopify? Read on...
Before I start - I talk about everything in Kg's. If you work in Lbs them simply replace what I say accordingly.
Step 1 - understand how much your good cost to ship
The first thing you need to do is decide how much your goods will cost to package and post. If you're drop-shipping, your supplier will tell you or if you're selling your own stock, then you can find out from looking at your local postage company websites.Either way, to utilise the default Shopify shipping by weight, doesn't mean you assign actual weights to products. Instead, you use weights as a reference to cost. Let me explain.
Say you're selling a widget that weighs 4kg. You know that to post this to your own country will cost you £2 and to the rest of the world £4. If you assign that product a weight of 0.1kg, and in your shipping rules set the cost of everything from 0kg - 1kg as £2 local & £4 rest of the world, then this is what Shopify will charge your customer. The ACTUAL weight is immaterial.
Step 2 - Create shipping zones
I live in the UK and setup shipping for the following zones: UK, Europe and Rest of World. That means I end up with three shipping 'tables'. So, log into your Shopify admin...In there, you will either see the default shipping rules or the rules that you have setup so far. At this point be careful, what I will show you is how to setup weight based shipping and will affect your shipping costs on your store if it is live! Proceed with care...
Delete the current zones. Under Zones and Rates, click Add New Zone and add a local zone (mine's UK) and any others. I set one for Europe and Rest of World.
Step 3 - add the rates in each zone
First your local shipping zone - fir me the UK. Click 'edit' and remove all of the existing entries.I have three shipping options: Regular, Recorded and Courier, so I need to set cost for each of these. Start with Regular by clicking Add Weight in the weight based shipping box. In the 'Name' field put 'Regular Shipping'. In the 'Range' field put 0 in the first box and 1 in the second box. In the 'Rate Amount' field, set the cost of your cheapest shipping item.
The repeat this, only in the 'Range' field enter 1.01 and 2. It is important to set 1.01, as this is more than 1. If you simply put 1, this will confuse Shopify and become buggy.
Then repeat this for all of your other Regular Shipping costs. Then repeat once more, only this time using 'Recorded Shiping' (or whatever you want to call it) in the 'Name' field.
Then go to you next zone and do the same. Each time adding the different costs you need assigned to a weight.
My shipping tables on one of my stores looks like this:
Step 4 - Assign weights to your products
Then you need to go to your Products page. Here, you can set a weight for each product. Don't set the actual weight, instead set a weight that aligns with your Shippign. A weight of 1.1kg is in the range of 1.01kg and 2kg in my table so will cost £2 to the UK. Two items will total 2.2kk, which is in the range of 2.01 and 3kg so will cost £4, and so on. Rember that if you set a product weght higher in the range, say 1.9kg, then two of those items will total 3.8kg and therefore come in the 3.01kg to 4kg bracket and cost slightly more.You need to do a bit of simple maths to make it work for you.
Step 5 - an important final step
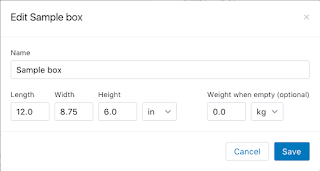
This is a real gotcha, and not obvious. I don't knShopifyShopufy sets this as default, but you need to go to Settings > Shipping and scroll down to packages. There you will see a box called 'Saved packages'. If your weight isn't set to 0.0kg, then you need to click the link 'sample box' to edit it:And click save - it should then look like this:


No comments:
Post a Comment